1939 NURBS Model
- Tracy Richards

- Jan 6, 2022
- 17 min read
Updated: Mar 3, 2023
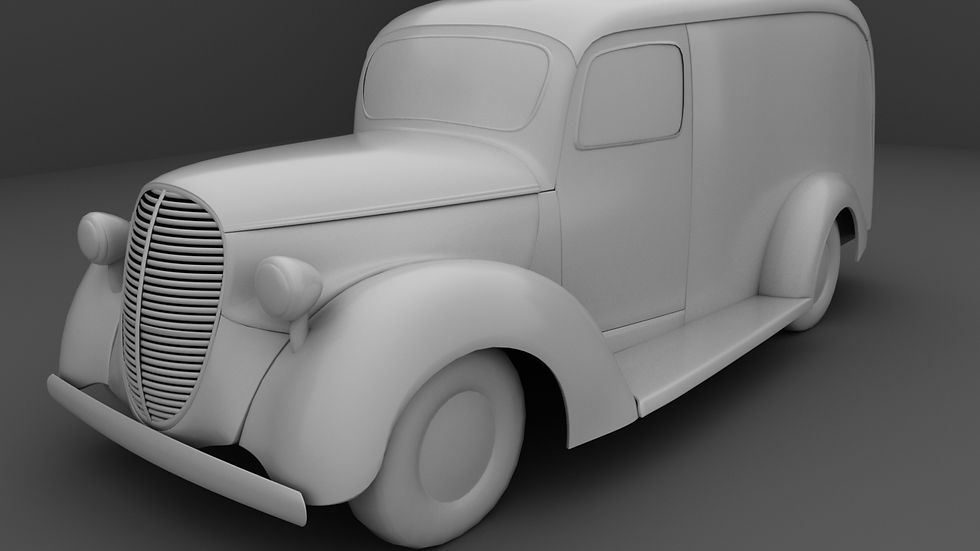
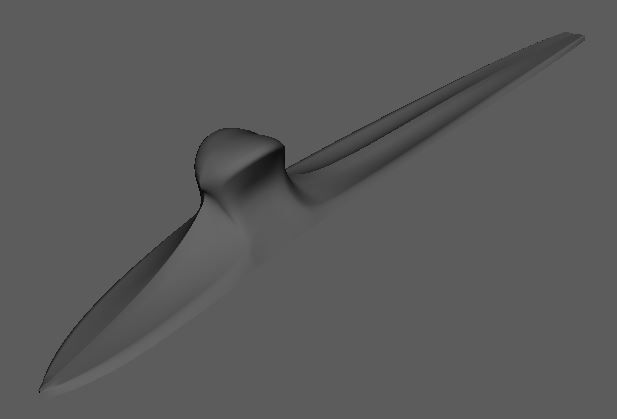
Hard-surface model of a 1939 Ford Panel Van
Research (Vehicle)
After much research, there seems to be no easily accessible blueprint of this particular truck, and many mixes up the name between truck and van. That makes the search harder for the correct type. There is also a version that some are labeling "mystery" Ford Panel Van. They look extremely similar in overall shape but the grille panel shows that it belongs in 1941. All these factors made it hard to narrow down references to work from.
During that time I found a blueprint for a 1937 Ford Panel Van that should work well enough as a base and the rest I will have to adjust. Since they are so close in years I have to find all the differences between the two bodies and interiors.

Restored (Left)
Figure Reference (below)


1/11
On Friday I was given more freedom for what car could be used in the possible scene. From this came a weekend full of research and contemplation. I came across so many cars from the 1950s that are beautiful to look at and geometrically intriguing. Even though they would be fun to model I still felt like I should do 1939. I spent all weekend reading and looking at cars just to keep the same one but I think it was an important journey because it showed me just how little people know about this particular truck.
While coming to a final decision I found a list of reasons why I have to do this model.
The simplicity is always a façade and is just hiding challenges I want to discover.
It's not very well known. Even in the car and restoration community, very few are able to identify the truck correctly.
There are no blueprints...
Yep. Having no blueprints is a reason why I think I definitely have to do this model. I get to modify another to create my own set of blueprints. I love reading and understanding new mechanics of things and this falls right into it. Being a 3d modeler I will have to be able to work from whatever reference is available to me, so I believe this will be a great opportunity to fill in the blanks.
Seeing that there aren't any 3d models of this already means I get to produce an original work that isn't getting compared.
1/13
NURBS Modeling
Having decided to make this a NURBS model I had to first learn how to use them. I started to play around with them during the last class to get some familiarity. Today I went through written blogs and tutorials on NURBS. The most helpful ones were on cars:
https://lesterbanks.com/2019/09/how-to-make-a-car-in-maya-using-nurbs/
These were detailed and used slightly different concepts. Bi-rail seems to be the best option and the patching method from the other tutorial would work well with it. The Bi-rail guide showed different methods of using it and cutting curves but kept it very simple. The concepts were easy to understand but I am most worried about the smaller detail later on. I think using Bi-rail to make a poly surface and deleting
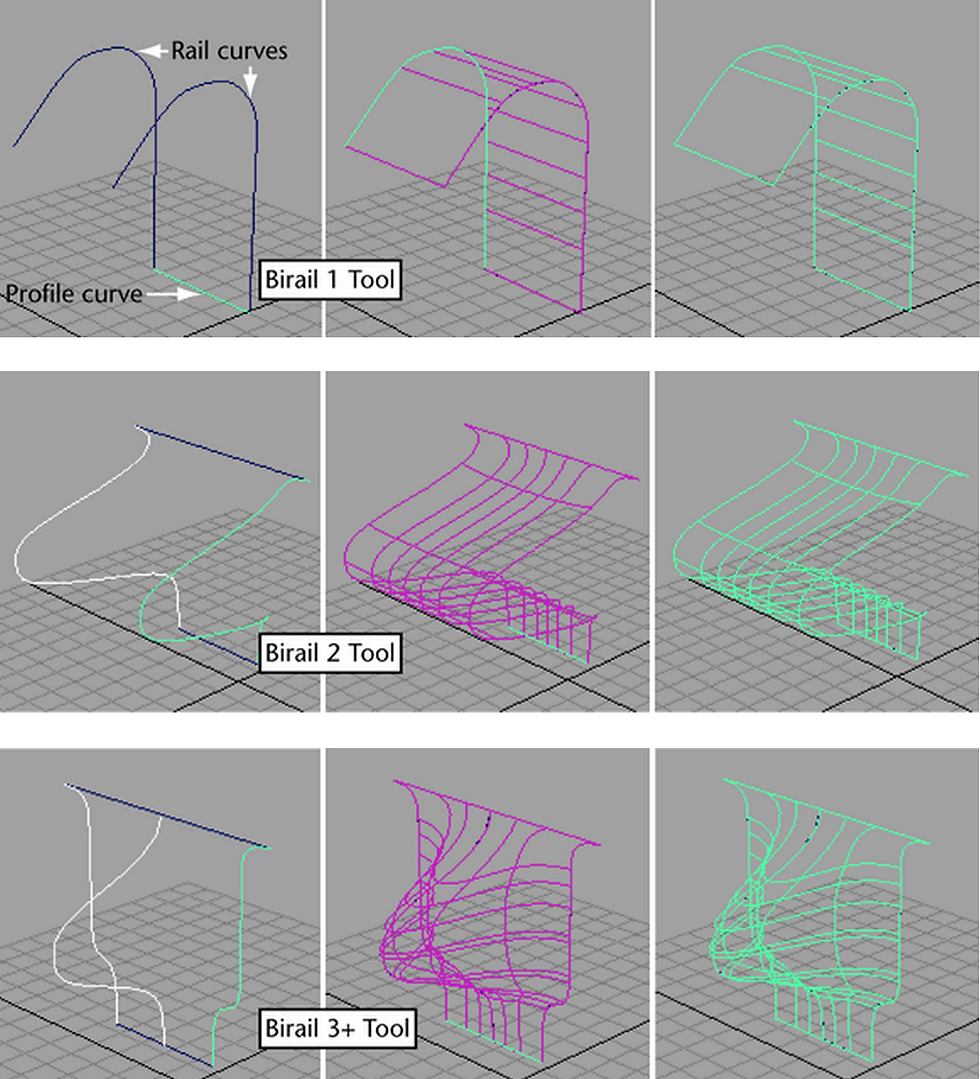
history to patch is going to work the best for now.
I'll start on the fender and see how that turns out before moving on to other parts. Might work front to back for the frame then add the smaller detail.
1/19
Finally started modeling can so far it's going well but not without a few challenges. I kept with my decision to start with the fenders and work along the front.
Creating the initial curves and creating the Bi-rails went fine but fine-tuning the shape was a little harder. My first mistake was setting the Bi-rail creation to polygons. The tutorial I watched used that setting and, since I didn't know better, so did I.

After finding out about Hulls and controlling those points I was able to keep the NURBS surface and change the shapes more efficiently than any of the tutorials I have found. There was a consent theme of erasing and restarting in the tutorial video that seemed to only pop up since he was converting the NURBS to polygons too quickly.
The hood seemed like it was going to be easy so I went to it next. It was a bit of trial and error at first. The front of the van has a very particular ellipse shape. For some reason, I thought I could just build it in sections and create it backward. I then realized that is stupid. So I made a NURBS circle and fit it to the right shape, cut it up by adding points and inserting the knot, then detaching the selection of beginning and end edit points. This idea carried into the back of the hood which I was also having problems with up until then.

After making one half I duplicated it and scaled it to -1 on Z then attached the surfaced. Thankfully attaching NURBS fixes any small tangency problems. (I also made sure I could detach it so I can still edit on one side and copy it over). Isoparms get weird with symmetry.
Using the attached concept I was able to make the side panel that connects the two. The curves I needed to create didn't line up for a Bi-rail to work so I had to split up the shape. Attached the two surfaces and added some Isoparms to define the crease more.


1/20 (class 5)
1/25
Reworking Curves

Putting together the class 5 video made me step back and look at my work for a while. I was able to see many areas that needed to be reworked after learning a better way to do it. Since I am learning as I go, there were some pieces that I hadn't touched after the first try. My biggest concern was the curvature of the very front bottom piece. When I was rendering I saw that it looked nothing like I wanted it so I went in and used different methods I picked up to fix it. This pulled me into a little rabbit hole of fixing all my curves and basically getting rid of all my prior surfaces.

Doing that allowed me to get more of a flow between the pieces. I had to start thinking of the curves like a much larger line and then cut it down. Before I was trying to match up separate curves and it was 1. taking forever and 2. never getting perfect tangency.
1/27
More reworking and tweaking curves. Also laid out some curves for the side door and windshield.

The windows and doors were done using a NURBS circle. I took the primitive and found the rough shape then rebuild the curve with more spans to refine the corners. This way was much faster than changing the spans in the primitive parameters. Changing them too early made the curvature harder to manage and becomes a guessing game on how many you actually need. By doing it later, I was able to assess exactly how many extra CVs I need without having to move everything after. I was curious is if a NURBS square would work better and right away there were a lot of things that I didn't want to deal with.
First off, each side is separated so to get a smooth shape I had to attach them to each other and deleted the joining CV. It looked fine until I got to the last one and realized it can't attach back to itself, leaving an open-ended curve for the window.

I found that duplicating the curves and scaling to flip it gives me a good idea of how it's coming out proportionately. Definitely need to bulk out and take in some areas. I'm not worried about this though because it's very easy to make those adjustments with a lattice. Selecting any curves and going to Deform > Lattice makes a box around the curves that I can take vertices and move the curve uniformly.

I am seeing too much "pinewood derby" in the profile right now so my next steps are to broaden it up then continue to work on adding larger curves.
2/1
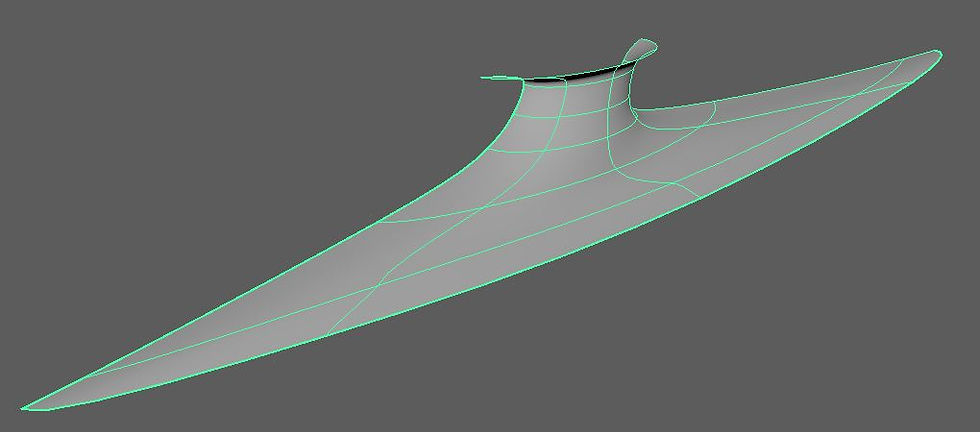
I am much happier with the overall look of the car profile. I started cutting the curves and creating surfaces in the front.

This iteration of curves is very close to being my final look. I think that by perfecting the curves in this stage I will be able to work much faster on the isoparms and overall surface creation.

Some of the cuts have to happen after another section is built. Seeing what needs to be done first and second can get tricky but it's getting easier.

Without attaching any surfaces yet, here are the first few surfaces. They come in fast but the cutting and detaching process takes up so much time just to put one edit point in. I think I am going to program some hotkeys onto my extra mouse buttons and see if that will help a little.
2/3
Getting all the surfaces in feels a lot like putting together a puzzle. I am having fun getting pieces to blend together but sometimes it gets complicated. I need some pieces to attach but others to be cut out. I haven't gone into this stage yet so it's more trial and error until I get something I like.

Most of the visible seams are the places I'm running into trouble or places I can start the initial detail work. The framing on the window needs to be refitted since I deformed the rest of the truck. Using the lattice deformer I adjusted the surfaces instead of the curves. I found that moving the curves too much this late in the process caused more work than if I were to adjust it later as a surface.

The front part that "connects" the fenders together has a very specific look to it that I have been having trouble with. I have two methods going on in the photo. On the right, I've attached two surfaces but doing so causes the creased section to curve. That crease is from an isoparm I've added to pull the corner back. On the left, I kept the two surfaces separated. I think by doing nothing it looks better but I worried about problems that might come up later.

The back and roof are my main concern right now. I've separated surfaces for the back doors but by doing that, the connecting "beam" from the side to the roof doesn't have enough surface to connect to. I think I'm going to try cutting it down to connect at least a part to the roof. My other thought is to make a copy of the doors and connect everything together and then make some rough cuts.
For midterm presentations, I am going to create a breakdown of the NURBS process and hopefully create a turntable of Surfaces (detached, attached, beginning of refined), Curves, Wireframe, and maybe throw in a picture of the lattice to show the deformation between the Curves and Surfaces stage.
2/8 Midterm
2/15
The first thing I wanted to work on from midterms was the tessellation problem I was having on the grille. It seems that the rest of the surfaces are rendering out relatively fine with the adjusted "Crv Precision Shaded". For some reason, the NURBS cylinders are having a hard time with it. In the viewport, it works fine yet I get an error for the render. I found that toggling 3 for smooth preview resets any adjustments to "Crv Precision Shaded". I wasn't getting anywhere with changing the display settings so I moved on to changing the geometry. There has been a problem with rebuilding surfaces so that's why I didn't use that before.


After some trial and error, I found that if I rebuild using "1 Linear" for Degree U and V then rebuild again using "2" I get the desired result. I've only had this problem with the NURBS primitives so far.
There's been no luck using any other setting with the primitives. When rebuilding the BiRail surfaces having it set to "3 Cubic" worked just fine.
After finding this method I was able to select all the grille pieces at once and rebuild both times with no problems.
I am going to avoid using primitives everywhere I can from now on. It seems to cause more problems than curves. Plus curves give a more dynamic shape in my opinion. The headlights are currently done with primitives so I want to go in and change them. For now, they are a good placeholder
and I can copy curves for a BiRail or loft.
Starting to test out pulling Isoparms for the details along the hood. After handling curves and control points for a while now I felt more comfortable doing it by hand. The one this I do find annoying is that isoparms don't work with symmetry so I have to split the hood and duplicate/flip the half hood again.
2/17
Continued pulling the wheel, side, and back details. Hood ornament research.
The sides came out really well and didn't take too much frustration. Something I find interesting is that even if you have an object selected you have to right-click and drag over the object for it to change to whatever function. If you try and change selected object A to isoparms and you start the drag over object B, it will activate object B. Before this project, I never really used the right-click to change modes for polygonal modeling. I had a method that allowed me to do a large portion of work in one mode and switch only when needed. I have no idea how that happened but it was most likely a habit I had from starting with 3Ds Max. When switching over the Maya the whole interface was changed so I had no idea how convenient it was and I am still learning little things. Using NURBS forces me to work this way and I am so glad it did.

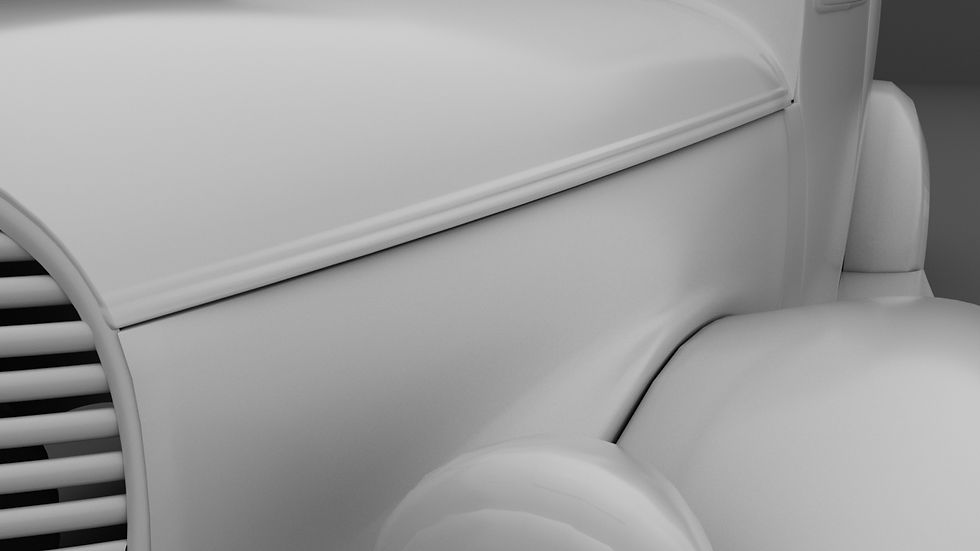
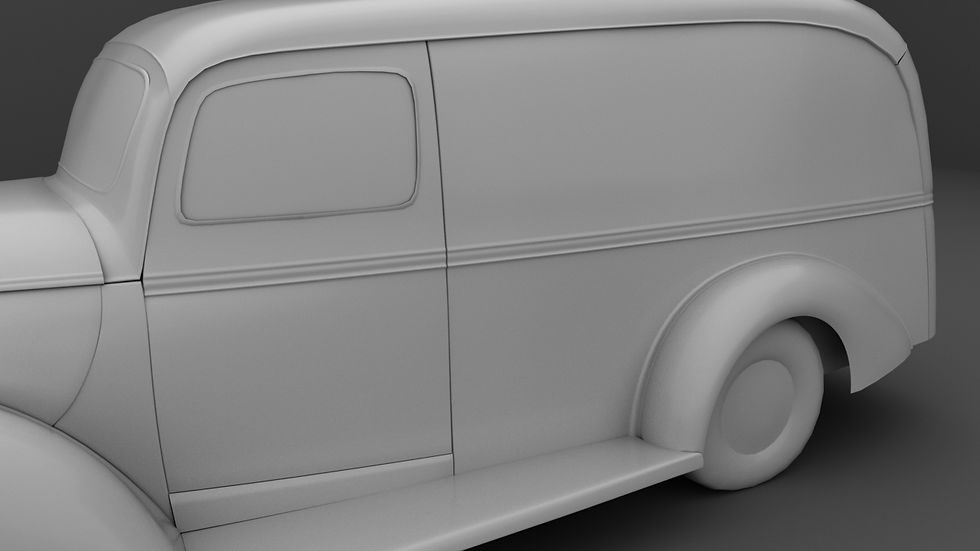
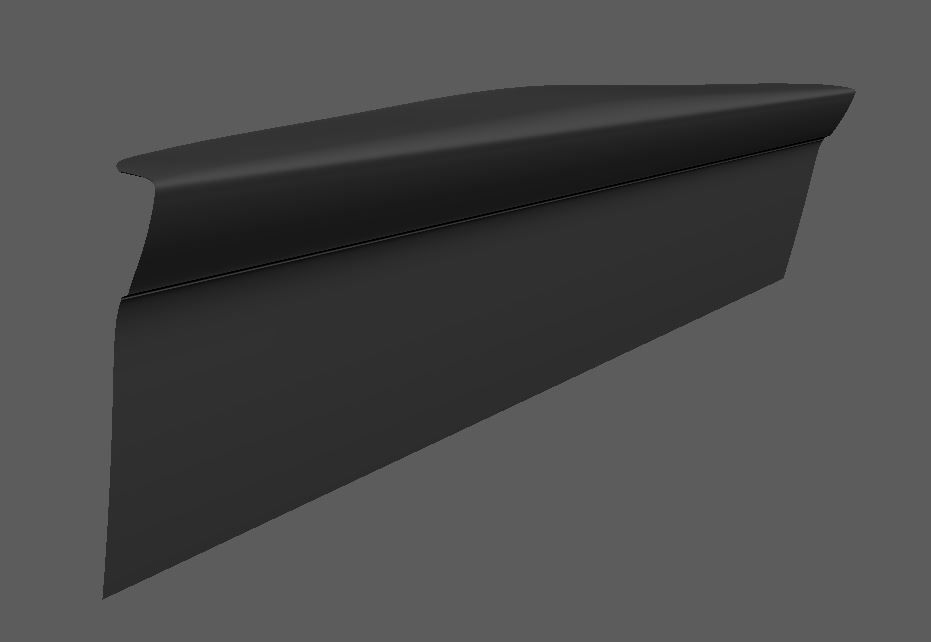
Going back to the van, I started moving in the back windows. The right door is an older version of the door so it looks a little weird. The seams are also rough since I was changing the door shape. Side details are making a pinch all the way to the door, but that is getting taken out. In my reference, the detail tapers out and isn't visible past the turn to the back end. I have decided to place a rule on myself. If metal can plausibly make that shape, then leave it alone. There are so many little things I can tweak but I have to focus on the other aspects so the whole thing can progress forward. I can always come back and take out things I don't like later on.

Looking at the hood ornament, I did the research for a while came up with a few choices. This first one is the classic that is also shown on the restoration references. To my knowledge, this is what comes off the factory floor. Naturally, I would want to use this one but changing the hood ornaments was something that was very common. I decided to find what else could've been used.
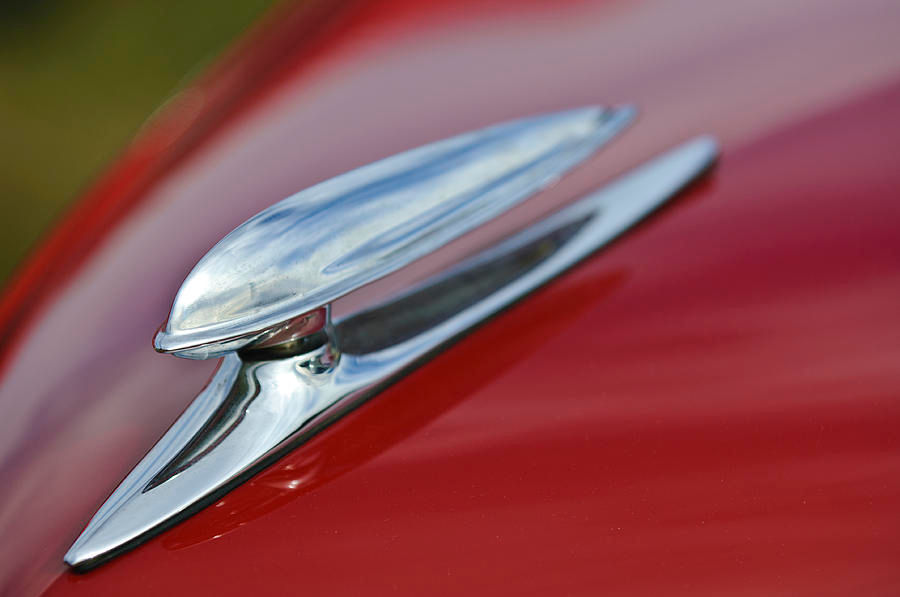
This is my other option. It was relatively difficult to find the right alteration since the profile of the base really matters. A little more reminiscent of the "flying lady" type ornaments and I believe is more recognizable. I think my choice on this is going to help with my overall vision of the look. If someone cared enough to change out the ornament for aesthetics then I might want to make this more of a "well taken care of" delivery truck. I really like the look of pinstriping and even though texturing is so far off I will have to include it if I choose the modded ornament.
2/22
Began experimenting on how to tackle the ornament. I started off with curves for a BiRail. It's working okay but the cylinder shape in the middle is throwing me off.
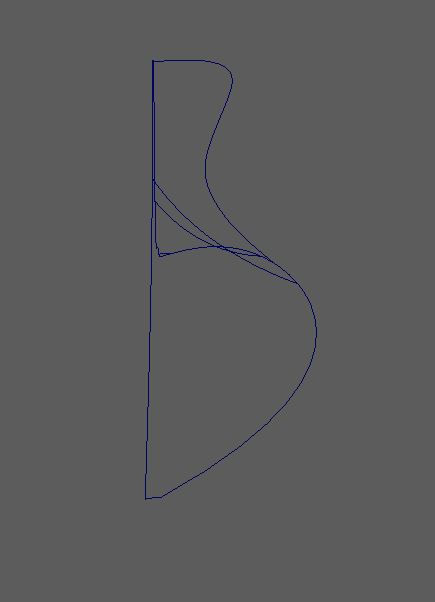
Here are the curves I made. I going to have to spend some time really looking at ornament and drawing it out to understand the best way.
Tried pulling on the hull to see what I can get out of it. I think the ends are workable but that center cylinder needs a lot of work. Before I even attempt to pull it out of the CVs I am going to try and find a better way. I'm sure there's something easier and faster out there.
2/24 - Class 15
2/28

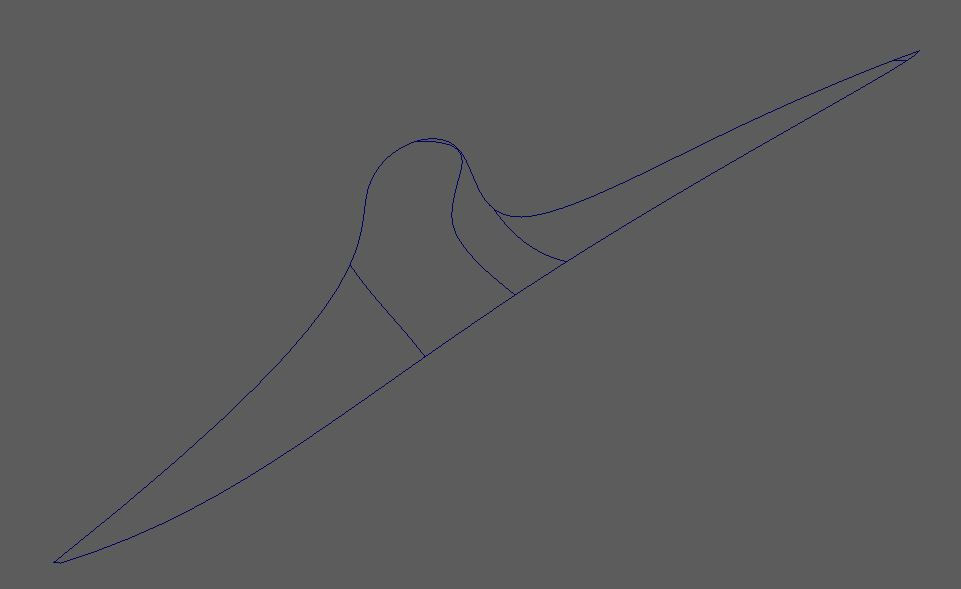
After drawing out the base of the ornament I could better understand how to go about it with curves. Breaking it down into simple shapes and then connecting with single lines worked the best. I then translated these into curves using NURBS circle primitives and drawing a curve that connects all of them.

The circles were cut in half and snapped the ends to sit on the long rail curves. Also needed to add an extra profile curve to near the bottom to smooth out the transition.

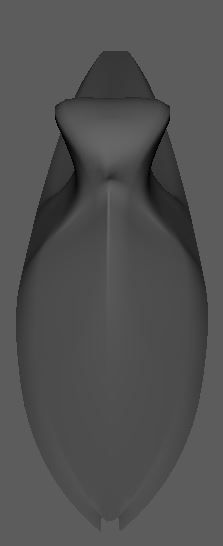
Using the 3+ BiRail tool I was able to make this surface. I am much happier with this base shape And was even able to start trying to create the top. I will have to do these in two separate pieces because 1) it takes longer 2) when I try to rebuild to smooth it out, it completely disappears.

2/8
I still need to make a proper update for last week. That will focus on modeling but for now, I am working on the timing for the video. This is also including space for the interior next quarter. It stands at just over a minute. I took the beginning and end of ZZ Top's "I Just Got Paid", probably need to take some more from the middle to give more time.
3/14 Class 20 Final
Spring Quarter Studio 2
Moving onto the interior of the van, as well as any outside adjustments I have time for.
3/30
The plan for the inside was to start fleshing out the basic blocking to make sure everything is proportionate and fits well. I began with the largest base which was the dashboard.

This was the best angle I could find of the whole dash. Here I can see the profiles and rails to create a Birail surface. Duplicating and Isoparm from the already made window surface gave me a good base for the connection to the window frame.
While looking at the window I realized that the whole thing is disconnected at the bottom. I didn't notice this on the exterior photos so that is something I have the adjust later on. As of now, the windshield bows out further than it should.


Sometimes when I make the curves I'll invert protrusions or recesses by accident. I don't usually catch these until I make the Birail surface. Here it wasn't a big problem so I was able to adjust it using the Hull.
The changes are subtle but fit more with the shape of the reference.
I was thinking about making the rest out of separate pieces but after a longer look, I changed my mind. I added Isoparms as I stretched out bends working down the whole dash. I was able to reach the single piece to the floor.

Obviously, there are many smaller details to add but this works as a good base for the rest of the spacing.
Now that I am trying to connect both the exterior and interior seamlessly I have found a challenge within the shell of the Van. Getting the depth of the form is much harder than in polys. My thought is to duplicate the "seam" curves of the finished shell and add profiles so hopefully, the Birial will align seamlessly.
4/3
Well, I was pretty excited to write this update but it looks like all the work I did last class is gone... I spent a large portion of class mentally mapping out what needed to be done next and after deciding the door needed to be redone, I started working on that. My biggest challenge was to get the hole for the window without Boolean. I ended up figuring it out and almost completed the whole door. I was actually really happy with how it came out. However, I went to open it up to finalize some things and take screenshots and the door is gone. The curves I was using are all separated for whatever reason and I can't find one of the curves. Them being out of place shouldn't matter since I had deleted history on the surface already. There is also no reason for everything to be that offset so I'm just overall confused and angry.
I am on so many levels of annoyance right now so I am just going to step away from this for the night and play catch up in class tomorrow. The good thing is that I remember everything I did right to get the doors so now I can bypass the trial and error phase. Hopefully it won't take long
4/5
The last class was very productive and I was able to complete more of the door than I had before I lost it. At home, I finished up the rest and added a window.
Details on the door interior are going to happen after class 5. For now, I am blocking out the inside and then refining. I spent a lot of time getting this door back so I don't see the rest having as much detail. The hard part is keeping it simple because I want to work a piece to completion and then move on.


Here is a comparison of the new to the old door:


Progress on the overall interior so far. The door was a trial for the front windshield because I need to use the same process for that.

4/10 Class 5
4/12
I got the windshield set up for birail surfaces. The curves are duplicated off the surfaces I already had. Then I made sure they all matched the door. After adding the profile curves to create dimension to the surface, the curves are finished.
Before I make the inside curves I need to figure out how it all connects on the inside. Most photos I've found have that section cut off. Just have to look a little more.


4/18
I took a break from modeling after I finished the windshield and worked on the shading. I was never happy with just the blue look I had last quarter. It was a classic color and more interesting than just black but it didn't quite fit my aesthetic. In my searching for interior photos, I came across a 1939 restoration that I not only got the images I needed, but I also fell in love with the color.

This listing has 35 photos of the interior and exterior completely restored. I had seen other restoration sales for the 1939 but they all had parts that were wrong and didn't match the original car. This is the closest match and I have yet to find a difference. The interior shots are also pretty detailed and I can see pretty much everything I need to.


I got a little excited over the colors so I immediately slapped some shaders together to see how I liked it. My color management was all messed up in the first render test. For the second one, I am seeing how I like the tire colors. Still have a lot of tweaking to do but I like that this is mostly out of the way for later.
4/20
Since I am going to render out a whole new video from last quarter I decided to change some shots as well. After seeing them over and over again I grew bored of the simple pans and pushes. So I did some more research so find some better ideas. The YouTube channel Classic Car Studios had some of the better inspirations that I'll be looking at.
This video also had some really interesting interior shots.
While watching these I paid attention to any unique sound design choices made. As of now, the video I have now is very dependent on the amount of music I have. Since I'm using just the instrumental parts it cuts down the amount of time I have. In one of Classic Car Studios videos they used an engine revving and it added a good 30 seconds. I loved that and I have already found the sound of a V8 to put in. Already knowing the engine used in the 1939 made it a lot easier.
The shots I'm changing should only be tweaks to make them more interesting. I'll have plenty of time this weekend to get renders out as well.
4/25
Lots of camera adjusting but I have playblasts of 2 that I'm pretty sure are done. Played around with DOF too and I'm really liking how it turned out.


4/27
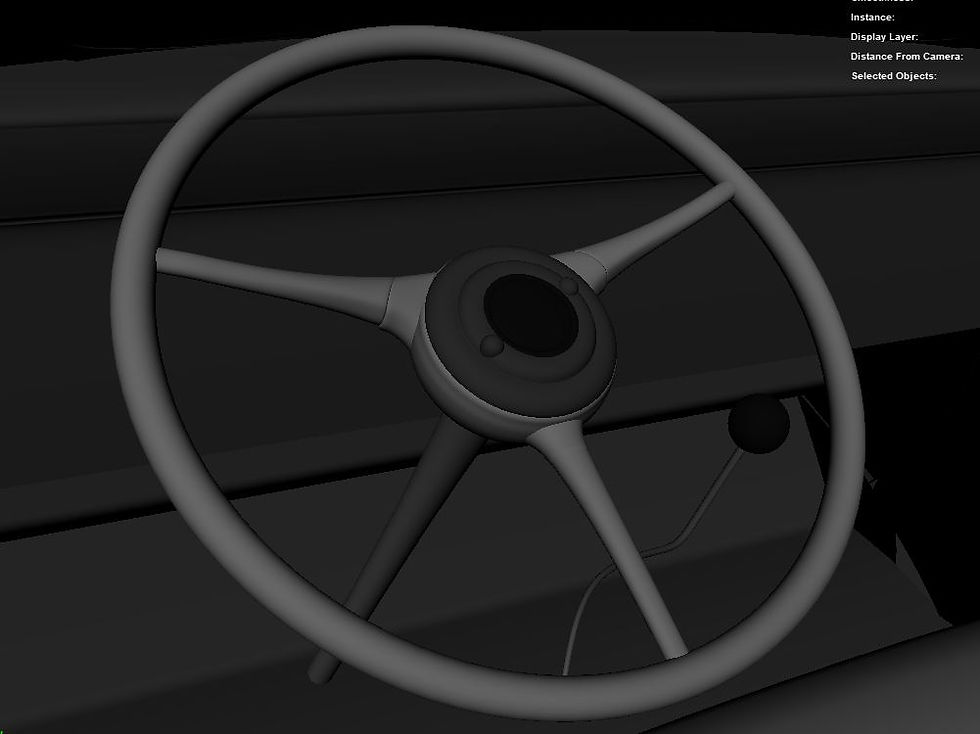
Another camera move done and the steering wheel completed. On the camera move, I am debating if I want the top light visible or not. When it moves over the car I keyframed it to disable so we can see through. The problem is continuity, but this is also VFX so I am allowed to make things that aren't physically possible. I think it comes down to which composition is better and I can't decide.


I also pretty much finished the steering wheel and gear stick. I grabbed only photos of the wheel since the stick was really just a NURBS cylinder and sphere.


I'm working on getting the visible pieces on the dash so I have something to focus on when setting up cameras for the interior. Another thing I need to do is figure out the lighting of the interior but it can wait a little since I'm doing playblasts for midterms.
5/2 Midterms
5/11
Focused a lot on the small details of the driver's side and the floor. I also added some new shaders while cleaning up the hypershade. I've been able to cut down modeling time by taking other assets with a similar shape and making small adjustments. So far all my handles have been a variation of the side door ones, and the same goes for the casing on the buttons/handle base.

After getting the handles sized and placed I am getting a better idea of how big the bench needs to be. I have been putting it off because something felt off in the space between the steering wheel and bench. When I place and size things I use the references but I can only get so much information out of them. I then think about the function of the piece and make sure that is it functionally plausible and comfortable in human proportions.
In class, I'll be working on the back end since I am much happier with the front half.
5/16 Class 15
5/18
I got my first render back and am almost finished with another. No notable modeling was done, but I did set up my render files in the farm so I only have to hit start for the next 5 shots. I am getting some artifacts in the highlights so I will have to address those as I get them in. Right now my main focus is to get my renders so I at least have some backup clips.
(This finished after I already wrote the above section)


Comments